Saxophone & Clarinet Lessons 503.888.5796
How to play clarinet part 4

Ah! You’ve reached the fourth mini-lesson in my four-part series on how to play clarinet. These 4 mini-lessons cover the following important information:
- Parts of the clarinet, the reed, playing on the mouthpiece and barrel combo, the embouchure, breath support, and reed care
- Embouchure review, lip push-ups, tonguing, mouthpiece/barrel combo, mouthpiece only, blowing F# and high C
- The rest of the clarinet pieces, how to assemble, how to hold, clarinet push-ups, cleaning and storing
- First notes on the completely-assembled clarinet, finger positions, how to read fingering charts, clarinet accessories (swab, cotton cloth, reed guard, cork grease)
All The Mini Lessons
How to Play the Clarinet Part 1 • How to Play the Clarinet Part 2 • How to Play the Clarinet Part 3 • How to Play the Clarinet Part 4
Why take lessons with Mary Ellen Grace?
Caiden’s dad, Brian: “Mary Ellen is a great saxophone teacher. It was her excellent website chock-full of raving testimonials that made us decide to sign up for lessons for our son, Caiden.”
Caiden: “As a saxophone teacher, Mary Ellen makes the lessons fun. I’m always excited to go to my lessons. How would I describe her? Fun. Easy-going. and Patient.”
 Why take lessons with Mary Ellen Grace?
Mini Lesson #4 Finger Positions and Clarinet Accessories

Thus far, you have successfully:
• Produced F# on the mouthpiece/barrel combination
• Produced high C on the mouthpiece alone
• Learned about basic reed care
• Applied cork grease to the mouthpiece cork
• Assembled the complete clarinet
• Developed your hovering finger skill
• Positioned your left and right pinky fingers
• Cleaned the whole clarinet
In Mini Lesson #4 you will learn to play some tones on the completely assembled clarinet, how to produce different tones using different fingering combinations, learn to read a fingering chart, and what clarinet accessories are important to have on hand.
So, let’s play clarinet!
So Many Fingers, So Many Keys
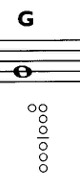
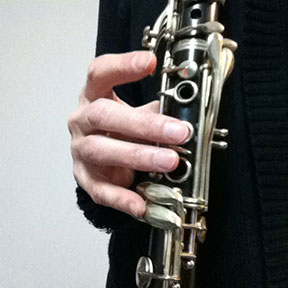
In Part 3, you learned how to hold the clarinet and to hover your fingers over the keys. The first note to learn is G on the second line of the treble clef staff.
When you are holding the clarinet properly and bearing all the weight on your right thumb, you’re correctly fingering this G. G on the clarinet is F on the piano. Go ahead and play G on the clarinet.
Concert Pitch and Clarinet Pitch
When you played the F# on the mouthpiece/barrel, I was referring to concert pitch. Concert pitch is the pitch played on the piano.
The clarinet is a transposing instrument in the key of Bb. The piano is a concert pitch instrument.
For the Bb clarinet, Bb is the pitch that will sound when the clarinet plays a written C.
I will refer to all pitches as what the clarinet plays followed by that tone’s concert pitch. For example, “play G/F concert” means you will finger a the written G and it will sound the same as the piano’s F.
Left Hand Tones
Remember that the left thumb is not holding the clarinet. Nor is it covering the left thumb hole when playing G.
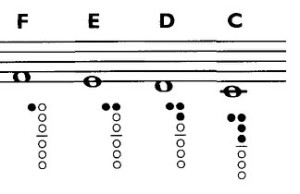
Close your left thumb over the hole on the back of the clarinet. This tone is F/Eb concert. Play F.
Keeping your left thumb covering the left thumb hole, your left index finger covers the first key hole on the front of the clarinet. This is E/D concert. Play E.
Add your left middle finger to cover the next key hole on the front of the clarinet. This is D/C concert. Play D.
Add your left ring finger to cover the third key hole on the front of the clarinet. This is C/Bb concert. Play C.
Check Your Finger Positions
Remember, in the previous step, you are adding fingers to produce a different pitch. To produce the G, no thumb or fingers are covering or closing any key holes.
To produce the F, only the left thumb key hole is closed. To produce an E, both the left thumb and left index finger key holes are closed.
D is produced by closing the Left thumb, index and middle finger key holes. And C is produced by closing the Left thumb, index, middle, and ring finger key holes.
Check Your Pitch Accuracy
When playing these pitches, check your pitch accuracy by sounding the concert pitch on a piano and make sure your tone matches the piano.
If you don’t have access to a piano, use the resource I showed you in Mini Lesson 2. <link>
Visit VirtualPiano.Net online. Tap any piano key with your cursor and that particular pitch sounds.
Clarinet Fingering Chart
Fingering charts give us a quick visual reminder on how to finger each pitch. Fingering charts have two parts. The first is a treble clef staff showing the written pitch as a whole note.
The other part, equally as important, is a simplified representation of the clarinet and the keys that are closed by the player’s fingers and thumb.
For the clarinet, you will see six circles stacked in a vertical line and separated by a short horizontal line between the 3rd and 4th circles. Those six circles, from top to bottom, represent the Left index, middle, and ring fingers, and the Right index, middle, and ring fingers.
The left thumb is represented by a circle immediately to the left of the top circle. There will be more circles added for fingerings that use the pinky keys.
Clarinet fingering chart This is a very simplified fingering chart that I’ve had in my studio for some time. I think it might be an older chart from Yamaha.
You can also find a newer one from Yamaha here.
Download any of these clarinet fingering charts; print one out and keep it handy during your early practice sessions.
How To Read The Chart
A filled-in circle indicates to close that key hole with the appropriate finger. An open circle is a key that is not closed.

The Right Hand
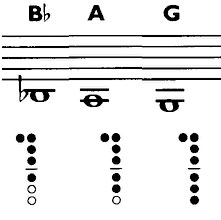
I want to show you some pitches below the C/Bb concert you played earlier. Starting from a fingering of that C, close the key hole on the right index finger. This is Bb/Ab concert.
A shorter way of referring to these fingerings is to use numbers. For example, thumb and 1-2-3 is the fingering for C/Bb concert. Think of the left hand fingers as 1-2-3 and the right hand fingers as 4-5-6.
Using this shorthand, play an A/G concert by using T-1-2-3-4-5. Play a G/F concert with T-1-2-3-4-5-6.
Pitch Summary
From the lowest pitch to the highest pitch, I have just shown you the fingerings for: G, A, Bb, C, D, E, F, G. That’s a nice little minor scale. Dorian mode, to be precise. However, if I show you one more pitch, we can turn this into a major scale. It’s a challenging fingering, so I’m saving that for the extra credit below.
Covering The Holes Completely
You may have experienced the pitches not speaking clearly. If this is the case, the most common cause is not covering the holes completely.
The fix involves a little experimentation. While you are playing a pitch, or struggling to make the tone speak, lift and reset your fingers.
For an example, let’s imagine you are playing low A/G concert. The fingering is T-1-2-3-4-5. Lift up finger 5 or 4 and firmly set it back down, feeling for complete coverage of each key hole.
That might do the trick. Or it might not. Try lifting and reseting finger 3 (left hand ring finger). You’ll have to do some experimentation to see which finger might not be making a complete seal over the hole.
Take care that you are not pressing your fingers down so hard that you cut off the blood supply and they turn white. Press firmly striving for a seal. There is no need to press so hard.
Important Clarinet Accessories
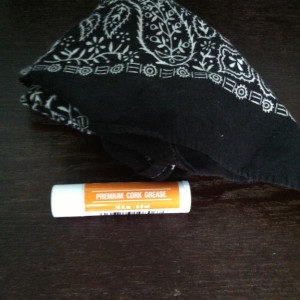
Cork Grease. You’ve already learned about cork grease in Mini Lesson Part 1. In that lesson, I showed you how to apply the cork grease to the cork on the mouthpiece.
Cork grease needs to be applied to all the cork on the clarinet; 4 places in all. They are the mouthpiece, both ends of the upper joint, and the bottom of the lower joint.
Cotton Cloth. Throw an old cotton handkerchief into your clarinet case. If it is large, you may want to cut it in half on the diagonal. Use your cotton cloth to remove any moisture that collects inside the mouthpiece, on the inside lip of the bell, or the inside lips of the barrel.
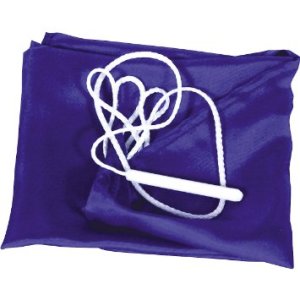
Clarinet Swab. In Mini Lesson Part 3, I showed you how to swab out the clarinet. I recommend getting a swab made of silk. This is a good material for soaking up the moisture on the inside of the clarinet.
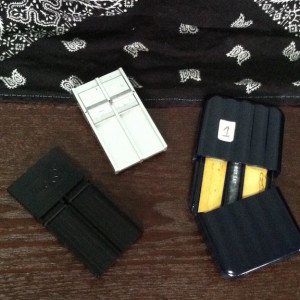
Reed Guard. Some reed guards are simply flat pieces of glass, metal, or plastic that hold tightly to the reed. Their main purpose is to let the reed dry flat.
If you put a moist reed back in the plastic case it came in, it may warp and not play well at your next playing session.
Other reed guards are enclosed models that have some kind of moisture-absorbing material (desiccant) within their reed holder. Either kind is fine to use.
Fingering Challenge
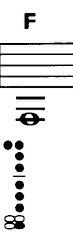 Here is that new pitch I promised you! The fingering is to close the key holes for T-1-2-3-4-5-6 and the right pinky on the bottom right key in the group of four.
Looking at the clarinet, there are four keys that are shaped rather long and broad and grouped together. The bottom right is the F key.
This new pitch is F/Eb concert. Confirm on your fingering chart which of the four keys to depress.
F Major Scale or Eb Concert Major Scale
You can play a major scale starting on low F, then G, A, Bb, C, D, E, F. Ta-dah!
Homework
Practice speaking each of the pitches I’ve shown you. Remember to use your firm strong clarinet embouchure to produce an accurate pitch.
Always support the tone with adequate air and use your diaphragm to push the air quickly through the clarinet.
Practice articulating each pitch repeatedly and sequentially. Also, play your scales up and down, slurring the pitches together.
Next Step?
Well, first, I just want to say “Congratulations!” If you have followed these Mini Lessons form part 1 to 4, you have learned a great deal and are off to a good start.
These Mini Lessons are intended as a way to get started playing the clarinet. Finding a good teacher is essential in making further progress with the clarinet.

If you are enjoying playing the clarinet and want to learn more, I encourage you to find a teacher to work with. Ask your friends for recommendations. Ask the local band director. Go to live performances of clarinet music (symphony orchestra, local school concert, combo at the neighborhood bar, to name a few) and talk with the musicians there.
And contact me. I’ve been teaching clarinet and sax in the Portland, Oregon community since 1991 and I love it! Teaching music lessons is a major part of what gets me up in the morning. 🙂
Contact me by phone: 503-888-5796 or by email: maryellen@meggrace.com.
All The Mini Lessons
How to Play the Clarinet Part 1
How to Play the Clarinet Part 2
How to Play the Clarinet Part 3
How to Play the Clarinet Part 4


[…] All The Mini Lessons: How to Play the Clarinet Part 1 • How to Play the Clarinet Part 2 • How to Play the Clarinet Part 3 • How to Play the Clarinet Part 4 […]