Saxophone & Clarinet Lessons 503.888.5796
How to Play Clarinet Part 3

Learn how to hold the clarinet properly and strengthen right hand muscles in part 3 of How To Play Clarinet.
This is the third mini-lesson in a four-part series on how to play the clarinet. These 4 mini-lessons cover the following important information:
1. Parts of the clarinet, the reed, playing on the mouthpiece and barrel combo, the embouchure, breath support, and reed care
2. Embouchure review, lip push-ups, tonguing, mouthpiece/barrel combo, mouthpiece only, blowing F# and high C
3. The rest of the clarinet pieces, how to assemble, how to hold, clarinet push-ups, cleaning and storing
4. First notes on the completely-assembled clarinet, finger positions, how to read fingering charts, clarinet accessories (swab, cotton cloth, reed guard, cork grease)
All The Mini Lessons: How to Play the Clarinet Part 1 • How to Play the Clarinet Part 2 • How to Play the Clarinet Part 3 • How to Play the Clarinet Part 4
Mini Lesson #3 Assembling the Clarinet
Yay! You are moving through these mini-lessons well. In this lesson you’ll learn to assemble the complete clarinet, how to hold it and where to place your fingers.
What you’ve accomplished so far:
- Produced F# on the mouthpiece/barrel combination
- Produced high C on the mouthpiece alone
- Learned about basic reed care
- Applied cork grease to the mouthpiece cork
- Cleaned the mouthpiece after playing on it
The Rest of The Clarinet
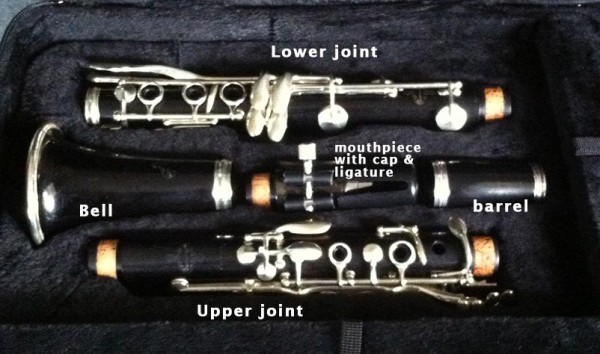
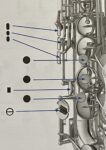
We begin mini-lesson #3 with a review of the parts of the clarinet. You can already identify the mouthpiece, ligature, and barrel. Confirm your knowledge by comparing those parts of your clarinet with those in the photo.
The three remaining pieces are the bell which is bell-shaped, the upper joint, and the lower joint.
The two joint pieces look similar to one another. Look closely and you’ll notice that one has cork on both ends and the other has cork only on one end. The 2-corked joint is the upper joint.
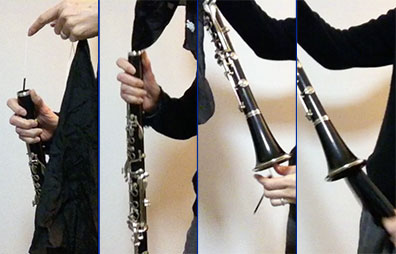
Connect from the Bottom Up
Insert the lower joint’s corked end into the bell. Set it aside.
Upper Joint
The upper joint has cork on both ends. So which end is the top and which end is the bottom?
The two ends are very different. The bottom end has a set of 4 keys and a bridge key overlapping the cork area. The top end is just cork.
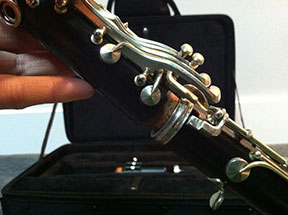
Interlocking Parts
Hold the upper joint in your hand so that the side with many keys faces you. Press your fingers down on the second ring key. This lifts the bridge key up.
Now while holding the upper joint in your left hand and pressing the ring keys down, pick up the lower joint and bell assembly. Hold the lower joint at the bottom and slowly push the upper joint into the lower joint.
Use small twists moving one joint back and forth. Try to do so without banging the bridge key into its matching bridge key on the lower joint. The upper joint bridge key rests on top of the lower joint’s bridge key.
The thing to watch out for here is making sure keys don’t get bent.
Add the Top
Once the three lower parts are together, add the mouthpiece and barrel combination. The barrel slips onto the cork at the top of the upper joint.
Make sure all the pieces fit snugly together. There should be no cracks between pieces.
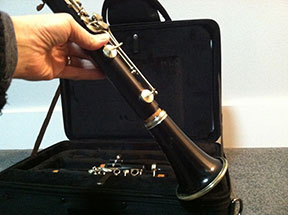
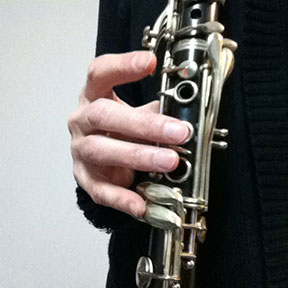
How To Hold
The clarinet is held by your right thumb, specifically the first joint of your right thumb. Added balance comes from a firm grip of your embouchure on the mouthpiece.
All your fingers and your left thumb must be able to move freely. Your fingers and left thumb do NOT hold up the clarinet.
Practice holding the clarinet with just your right thumb and holding the mouthpiece in your mouth. Can you move all your fingers freely?

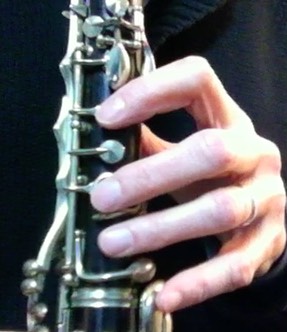
Hover Your Fingers
Let your hands be relaxed and find a comfortable position to float above the keys. The left hand fingers: index, middle and ring hover over the two ring keys and the blank hole. Your pinky rests lightly on the “B” key.
Your right hand fingers: index, middle and ring, hover over the bottom joint’s three ring keys. Your right pinky lightly rests on the “C” key.
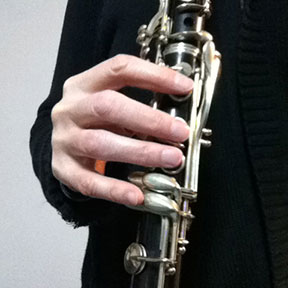
Practice holding the clarinet using only the first joint of your right thumb and your mouth on the mouthpiece. Practice holding the clarinet steady while you wiggle your fingers over the key holes. Aim for keeping your fingers close to the keys and avoid having them fly away.
Pinky Home Keys
Strive for having your pinky rest on their respective home keys. Can you lift your fingers (index, middle, or ring) while keeping your pinky on their home keys?
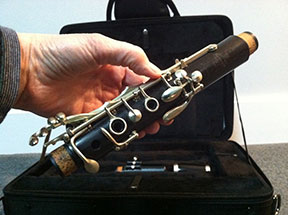
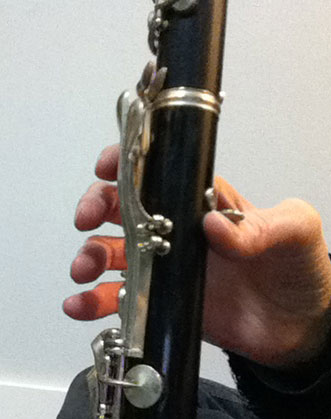
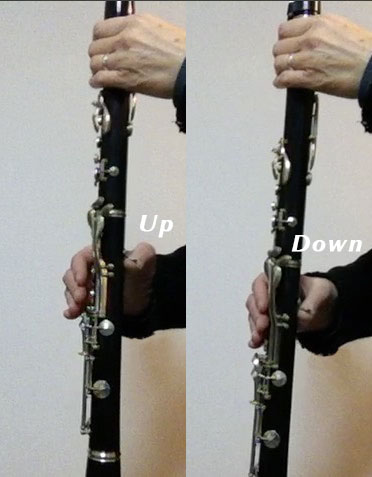
Strengthening RH With Clarinet Push-Ups
Clarinet push-ups are a simple exercise that will develop strength and comfort in holding the clarinet. Hold the clarinet with the first joint of your right thumb and let the barrel lightly lean against your left hand as in the photo.
Raise your thumb up and down repeatedly while allowing the clarinet to rest against your left hand. Strive to isolate the muscles in your thumb and use those. Do not use your wrist or forearm.
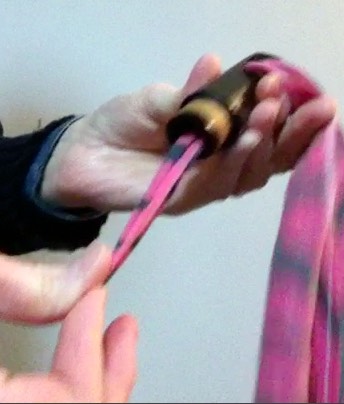
Swab the Deck!
After every playing session, clean out your clarinet with a clarinet swab. Cotton or silk are common materials used to pull moisture out of the clarinet. A swab is a triangle-shaped cloth attached to a long string. The string has a covered weight at the other end.
Gently drop the weighted end of the string into the top of the clarinet. Pull the weight out of the bell and drag the cloth all the way through the clarinet.
Use a small cotton handkerchief to thoroughly dry out the mouthpiece and barrel. Be sure to catch the moisture that gets caught on the lip inside either end of the barrel as well as the bell. Dry the ends of the joints too.
Homework
Practice holding the clarinet and doing the clarinet push-ups. When you are comfortable holding the clarinet and moving your fingers freely, move on to Part 4 of this mini-lesson: How to Play The Clarinet.
All The Mini Lessons: How to Play the Clarinet Part 1 • How to Play the Clarinet Part 2 • How to Play the Clarinet Part 3 • How to Play the Clarinet Part 4


[…] When you have accomplished these goals, you will be ready for Mini Lesson #3 in How To Play The Clarinet. […]
[…] to Play the Clarinet Part 1 • How to Play the Clarinet Part 2 • How to Play the Clarinet Part 3 • How to Play the Clarinet Part […]
[…] The Mini Lessons: How to Play the Clarinet Part 1 • How to Play the Clarinet Part 2 • How to Play the Clarinet Part 3 • How to Play the Clarinet Part […]